Having had the boat a few years now, I've taken the mast down and put it back up a fair few times. Firstly to install the roller reefing, then various maintenance tasks such as adding tape to the spreaders to stop (another) rip in the cruising chute. Most of the time I do this by myself these days having developed a bit of a technique over the years so I thought I'd share this "wisdom" with you, the Internet. This is probably not the best way of removing a mast in a tabernacle, but it works for me.
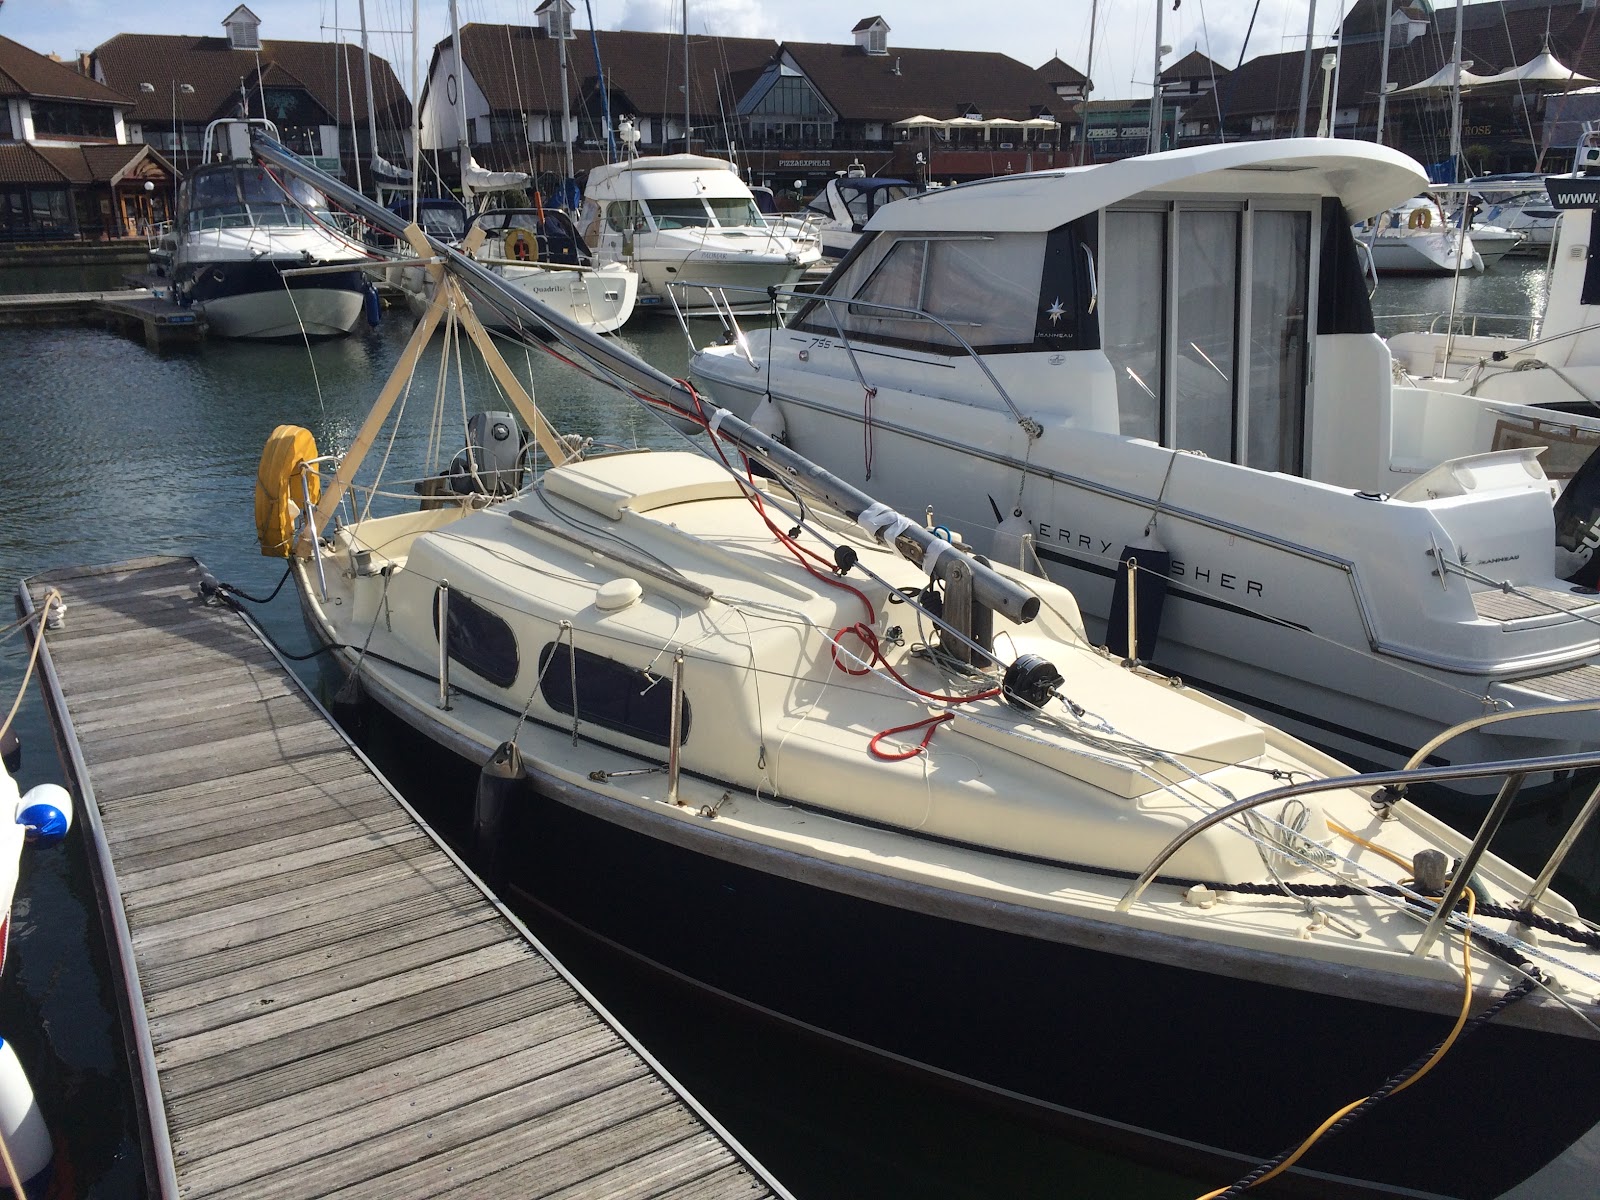
Step one is preparation. This is really, really important as surprises half way through are not fun at all (trust me!). At the stern, I rig a cross to hold the mast. This is little more than two pieces of cheap pine with a big bolt through them. As you can see, these are held in place with various ropes. One to the back of the tiller, which also ties to the traveller bar. This gives fore/aft stability to the wood. Next there is a rope from the top to the cleat on the port and starboard side deck which also then go on to tie the base of the wood to the pushpit in order to stop the bottom sliding about. This hold it fairly strongly in place ready for the mast.
As you'll also see in the picture above, I have taped everything up to the mast. Start this off by undoing the cables for lights and aerial and tape these to the stern side of the mast. A tabernacle makes an excellent scissor and will cut the cables if they are in any way loose. Luckily I found this out as I dropped the mast to replace the cables!
Next, remove the boom completely and bring forward the various lines tied to it. The sheet will come off and stay at the stern, the vang will sit on the coachroof, and the topping lift and lazy jacks come to the mast along with the halyard which will need removing from the main. Tape these to the mast with as little play as you can so that you don't later have ropes all over the place. I used to use electrical tape for this but duck tape (AKA gaffer tape) is much easier and neater as well as being easier to remove later by ripping it. Once you're happy with the ropes, it's on to the rigging.
Loosen all of the rigging screws, making sure to relax the tension all around before fully unscrewing. Although not necessary to loosen gradually first I think it puts less stress on the mast so I prefer to do it this way. Once these are all loose, I also loosen the bolts in the tabernacle. Remember that the top one will stay in while the mast lowers, but needs to be loose to allow movement The bottom one at this point can be loosened almost to the point of nut removal so that just before dropping the mast this is very quick to remove - you'll want to move calmly but quickly at that point so have everything ready.
This is my latest technique. I tie a piece of cord to each rigging wire with a bowline. This then goes through the deck eye and back three times to give me some leverage. I can then tighten it and tie off with some half hitches to stop the rig moving while keeping it ready to drop. This is also much quicker to do after raising than going straight to the screws, and you can pretension the wires before connecting the screws.
Finally, I remove the clevis pin from the forestay under the roller reefing. Here, I tie a rope to the bottom of the roller reefing which is led through the anchor roller and up to the coachroof. I use this rope to gently lower the mast until it's far enough down for me to just hold it. I then remove the cords from all rigging wires and the mast is essentially free standing. It can be helpful to tape the wires to the mast at this point to stop them going in the water if you're doing this on your pontoon/mooring (if you are, bear in mind that side to side movement can cause damage once the mast is free). The lower bolt in the tabernacle is next after putting tension on the rope to the forestay. The design of the tabernacle means you can lean the mast forward and it rests in place, so lean into it while removing the bolt so that it doesn't fall on you. Gently let the rope out and allow the mast to drop, standing near the (closed) hatch while it drops into your waiting arms. The further back you are the better your mechanical advantage for holding it up so don't be too close to the mast foot when doing this. You do, however, need to be on the coach roof since the rope won't be sufficient to hold the mast past a certain angle. Many use a pole in front of the mast to add leverage here but for me it's more effort than it's worth. Once the mast is in your hands, gently lower it to the wooden cross. This needs to be tall enough that you can easily lower into it from the roof as you don't want to be stepping down from the roof while holding the mast - trust me!
Tape the roller reefing to the front edge of the mast at this point to prevent damage to it, they bend easily and worse, get in the way while moving the mast. At this point you can remove the top tabernacle bolt.
Now it's just tidying up to do. Pick the mast up and slide it forward. You'll want to be near the middle of the mast for this part so it balances unless you have help. The base of the mast can slide through below the pulpit and stay sitting on the wooden cross.
Raising is simply the opposite to lowering :)
Welcome to my blog about Live Magic, a Vivacity 20 yacht based on the south coast of England. Here I will update on trips, maintenance and any projects being undertaken.
Monday, 30 March 2015
Parallel Pin Punch
I thought a little post on these might be a good idea since I suspect most people are unaware of them. When working on rigging, there is occasionally a pin which holds something in. On Live Magic, this is the case at the mast head where there are pins of around 5mm diameter holding blocks in place as well as to connect the standing rigging. By design, these pins are a tight fit, and although they do use split pins at either end to ensure they won't fall out they are extremely hard to remove. A hammer can be used to bash it up to a point, but then you need something small enough to go through the hole and keep pushing. Obviously, you could use a screwdriver or centre punch, but these will damage the pin and potentially spread the metal outwards, making it too large for the hole and therefore also even harder to remove. Enter the parallel pin punch, basically a round piece of metal with a flat end which is designed to push pins out of holes. They are really cheap too, so no excuses to not use them.
Tuesday, 20 May 2014
Beaulieu River
As well as woodwork, last weekend I took Live Magic to Beaulieu River for the first time. A friend and I had discussed this earlier in the year and never made it, and neither of us had been before. Alan was also somewhat new to anchoring - something we all suffer from in the Solent due to the relatively few anchorages and many marinas and moorings available. So, in the pub on the Friday night following a very warm day and with more forecast for the weekend we decided the time had come. The following morning I checked the tides to find that we didn't need to leave until 11am. This is new to me, having berthed in Emsworth behind the cill for three years I'm now able to leave any time I like and plan around tidal streams. It turned out that we left at 11:30 and slowly made our way down Portsmouth Harbour - I sailed most of the way but with a southerly wind ended up motoring the last bit which is also a requirement when leaving Portsmouth Harbour anyway.

Once out into the Solent we sailed west and caught a storming tide. I had 1kt through the water and 4.5 over the ground most of the time.

Since the wind was behind me, and due to speed and direction was very light indeed, I cooked dinner while sailing towards Beaulieu. I'm kind of lucky in that I can just take my cooker on deck and cut veg and stir the pot while also sailing if it's calm. Unfortunately this means when it's rough I have no gimbals and no hot food but it's a fair trade off.


Once we arrived in the river we were expecting chaos. It was the best weekend of the year so far and all reports say that this river is packed all the time. As it turns out, the anchorage was virtually empty, with only a single other yacht when we arrived. Once we had anchored, I inflated my dinghy and Alan launched his. We didn't need two, but I don't get to use mine very often and he was testing a new to him engine. We motored against the current for a while in some of the most beautiful surroundings I've seen on any boating trip - this is what boating is all about! We met with the harbour master who gladly took out £5.50 anchoring fee each in exchange for some knowledge of the river. On we went to tie up at Bucklers Hard and a quick pint in the Master Builders pub. This dinghy journey had been around an hour including a refuel stop (not planned :o/ ) on the way so we only had one pint in the lovely beer garden. In future I may skip the Spag Bol in favour of their barbecue burgers which looked great, but on this occasion we were both very tired so sped back to the boats in the dinghies this time with a little tide, and steering with body weight (a far more exciting way to steer the boat!).

Once back on board, I reheated the bolognese and cooked spaghetti (only realising at the last moment I have no colander on board). While cooking I poured a glass of cold Marlborough white wine and deflated the dinghy and put the engine away.

After dinner Alan and I chatted between boats on deck for a while until sunset while listening to the twitter of the birds on the Island and the gentle lapping of water against mud on the bank.

The following morning I awoke to paradise - another sunny day and still water.

I cooked bacon and made tea then did the washing up before we headed for home. With the wind from the south east against the east going tide it was a little rough on the way home but a fun sail nonetheless. Finally got back early afternoon and washed the boat down before heading home for a rest.

Once out into the Solent we sailed west and caught a storming tide. I had 1kt through the water and 4.5 over the ground most of the time.
Since the wind was behind me, and due to speed and direction was very light indeed, I cooked dinner while sailing towards Beaulieu. I'm kind of lucky in that I can just take my cooker on deck and cut veg and stir the pot while also sailing if it's calm. Unfortunately this means when it's rough I have no gimbals and no hot food but it's a fair trade off.
Once we arrived in the river we were expecting chaos. It was the best weekend of the year so far and all reports say that this river is packed all the time. As it turns out, the anchorage was virtually empty, with only a single other yacht when we arrived. Once we had anchored, I inflated my dinghy and Alan launched his. We didn't need two, but I don't get to use mine very often and he was testing a new to him engine. We motored against the current for a while in some of the most beautiful surroundings I've seen on any boating trip - this is what boating is all about! We met with the harbour master who gladly took out £5.50 anchoring fee each in exchange for some knowledge of the river. On we went to tie up at Bucklers Hard and a quick pint in the Master Builders pub. This dinghy journey had been around an hour including a refuel stop (not planned :o/ ) on the way so we only had one pint in the lovely beer garden. In future I may skip the Spag Bol in favour of their barbecue burgers which looked great, but on this occasion we were both very tired so sped back to the boats in the dinghies this time with a little tide, and steering with body weight (a far more exciting way to steer the boat!).
Once back on board, I reheated the bolognese and cooked spaghetti (only realising at the last moment I have no colander on board). While cooking I poured a glass of cold Marlborough white wine and deflated the dinghy and put the engine away.

After dinner Alan and I chatted between boats on deck for a while until sunset while listening to the twitter of the birds on the Island and the gentle lapping of water against mud on the bank.
The following morning I awoke to paradise - another sunny day and still water.
I cooked bacon and made tea then did the washing up before we headed for home. With the wind from the south east against the east going tide it was a little rough on the way home but a fun sail nonetheless. Finally got back early afternoon and washed the boat down before heading home for a rest.
Monday, 19 May 2014
New Teak
Hi all, sorry it's been so long since I've posted any updates I've been very busy. I've just replaced the teak strips either side of the companionway as the old ones broke - never hold on to the sliding hatch for support at sea!
The new ones are also teak, which I sourced from Robbins Timber in Bristol, UK. This is sustainable teak and although more expensive than other hardwoods isn't as expensive as you'd imagine. I ordered a single length planed to size, the single length was to avoid a charge per piece for two separate pieces. Once it arrived, I cut my two lengths and had a little left over to use for plugs.
I then used a router to round the edges. To do this, I first rounded the top corners using the router end on to the wood to give the rounded end, then used the same bit to round the long edges and around the top. Finally I flipped over the wood and rounded the bottom edge as the Vivacity has a curve moulded in to the fibre glass between the step and where the wood attaches.
Next, I bought a plug and cutter set from Axminster tools. This includes bits for cutting plugs and matching holes which are used to cover the screws. I also bought a pillar drill to make sure I was cutting square on with these bits although it would be possible to carefully do without one.
Once the screws were in I glued the plugs in with wood glue. There is some argument about whether to use varnish, glue or nothing for this but I went with glue as I have no intention of removing these again while I own the boat.

A few hours later, I used a hacksaw blade to cut as close as possible to the wood. The tape is to avoid marking the wood too much.

Next I used a plane set really fine to plane off any remaining plug to flatten. It's possible here to just sand back but that would probably lead to a less flat surface even using a sanding block.

Finally I sanded back to smooth with a sanding block and 120 then 180 grit paper. Here you can clearly see the double rounded top edge.
Tuesday, 10 September 2013
End of season?
I thought I ought to put up a little post since it's September to remind everyone that the "sailing season" is what you want it to be. I know one reader of this blog whose boat will literally be under a foot of ice shortly so he has an excuse but for everyone in Blighty take a look at the following pictures and ask yourself whether you really want to lay up soon, or if perhaps November is worth waiting for?
Sunday, 9 June 2013
Last week
Last week I sailed to the Isle of Man, and yesterday travelled 110NM from Peel to Scotland. None of this was on Magic, I'm only writing it here because someone on a forum used this blog as an example of my sailing experience, assuming that Magic was all I had sailed on and apparently 150 miles in a week in a Vivacity 20 makes me a poor sailor. With a bit of luck, said moron will realise that this blog is about the boat and not the sailor with this post and in future the blog can go back to just Magic related stuff :) The TT was awesome too by the way!
The run in to Peel (5 hours with the Spinnaker up, 10kt max TTW)
Loch Ryan, 5.30am
Sulby Straight, accellerating so hard the front wheel is up at 180mph
The Bungalow from the top of Snaefell
Tracks from the sailing
The run in to Peel (5 hours with the Spinnaker up, 10kt max TTW)
Loch Ryan, 5.30am
Sulby Straight, accellerating so hard the front wheel is up at 180mph
The Bungalow from the top of Snaefell
Friday, 3 May 2013
Yacht name (at last!)
Finally I took a photo of the name. The colours are a little washed out in this picture, both the name and the boat look much better in real life. I'm very pleased with the font and colour and more than a little relieved that the second name stuck! Thanks again to the forum member who made this.
Subscribe to:
Comments (Atom)
